If you don’t use your inkjet printer for a long time, you will often notice when you use it again that lines of text have not been printed at all, or that the printouts have stripes and streaks. Dry printer ink is usually to blame for such symptoms. Unlike toner powder, which can be stored for a very long time in the printer if stored properly, ink dries out relatively quickly. The result is small crusts on the nozzles of the print head and viscous ink inside the cartridge. In this article you can find out what you can do about it and how you can get dried printer ink liquid again.
Printer cartridge dried up: what now?
If the symptoms your printer is showing are due to a defective printhead, it must be replaced. With printer cartridges with an integrated print head, you can easily change the cartridge. If the problem is only with the dried ink, there are various measures you can take to get your printer working again.
Note: The following tips are all based on personal experience and careful research. If something goes wrong with cleaning your print heads or with other actions to liquefy the ink inside the cartridge, we can of course not be held responsible for the damaged cartridges. In this article, we just want to present you with a number of proven and inexpensive options that you can try out before you dispose of your dried-up printer cartridge (or sell it to someone) and buy a new one.
Variant 1: Remove print head and clean with cleaning fluid
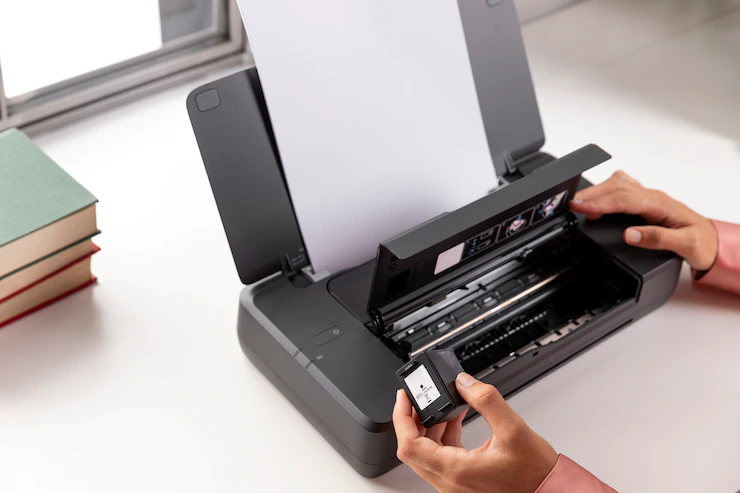
If you have a printer with a removable printhead, you can easily remove it and clean it carefully with a microfiber cloth or kitchen paper. Special cleaning fluids are available for this purpose in specialist shops. Under no circumstances should you resort to harsh chemicals, washing-up liquid and the like. A simple and inexpensive alternative is rubbing alcohol from the pharmacy.
Here’s how it works: To do this, simply remove the cover of your printer and remove the ink cartridges. Now open the print head lock and remove it. Then put some cleaning liquid on the cloth and gently clean the nozzle plate with it. If the incrustations are a bit heavier, spray a little cleaning liquid into the ink strainer. Now put the cleaned print head and the ink cartridges back into the printer and start a test print. If the cleaning does not bring the desired success, continue with variant 2.
For printers without a detachable print head, spray the cleaning liquid directly onto the ink screen after removing the print cartridge(s).
Variant 2: Soak the print head
If the print head cleaning with the cleaning liquid does not achieve the desired result and the test print still shows streaks, stripes or incomplete lines, you should soak the printhead a little longer to really loosen the last encrustations from the dried ink.
This is how it works: As with variant 1, remove the printer cover and remove the ink cartridges before you open the printhead latch and remove the printhead. Place this in a container that you have filled with plenty of cleaning liquid. The print head should be about 3 mm deep in the liquid.
If you let the printhead soak overnight, then pat it dry and reinstall it, your prints should be fine again.
Variant 3: Water bath for ink cartridge
If the unclean printouts are not due to encrusted ink on the printhead nozzles, but to viscous ink inside the cartridge, a warm water bath is the most helpful and cheapest way to make dried ink in printer cartridges liquid again.
This is how it works: Simply open the printer cover, remove the “faulty” printer cartridge and place it in a bowl filled with 2-3 cm of water. This variant is most effective if you leave the printer cartridge in a water bath overnight.
Variant 4: Start automatic printhead cleaning
Automatic printhead cleaning is the quickest way to remove incrustations from the printhead nozzles. However, this variant is also the most expensive in the end, since a lot of ink is consumed when cleaning the print head; the printer cartridge is accordingly empty faster. The ink is pushed through the print head with very high pressure in order to loosen any encrustations on the nozzles and to liquefy the ink inside. Therefore, it is best to only use the automatic printhead cleaning if all other options have not helped.
How to do it: Switch on the printer and open the printer cover to check that the ink cartridge is firmly seated. Now use the printer menu to start the automatic print head cleaning for the color that you have diagnosed as defective when printing. Then do a test print. If the print result has improved but is still not optimal, you can carry out the print head cleaning again.
Variant 5: Dispose of the printer cartridge and buy a new one
If none of the above variants help, you cannot avoid buying a new printer cartridge. Of course, you don’t simply dispose of the old, empty printer cartridge in just any bin, but sell it to someone or GeldFuerMuell. You can find out more about recyclable printer cartridges and the respective purchase prices here.
Prevent dried printer cartridges
If you don’t want to get into the awkward situation of having to try our tips, it’s best to prevent the printer ink from drying out from the start. This saves you time, nerves and, if in doubt, a few euros.
Tip 1: After you have used the printer, you should always return it to the idle position. The printer cartridges are only effectively protected from drying out in this position.
Tip 2: Do regular test prints to keep the ink liquid; even if you don’t really have anything important to print out. Any print head cleaning uses a lot more ink at the end of the day than one or the other regularly printed document. Test prints in a cycle of two to three weeks are ideal.
Tip 3: If you go on vacation or won’t be using your printer for some other reason, remove the ink cartridges, wrap them in cling film and put them in the fridge. With printhead cartridges, you can also simply seal the nozzles with the original adhesive tape and store the cartridge in a plastic bag. Although this involves a little effort, it is definitely worth it.
Tip 4: As a support, you can regularly clean the printheads with the special cleaning liquid or rubbing alcohol. However, the first tips are the best way to ensure that the ink does not dry up inside the cartridge.
What you should definitely not do to get dried ink liquid again
On many sites on the Internet, you get pretty nonsensical answers to the question of how to make dried printer cartridges fit again. At this point, we strongly advise against some of the advice:
- Never use harsh chemicals to clean printheads!
- Nail polish remover is not an adequate alternative to printhead cleaning fluid!
- Dishwashing detergents and other conventional household cleaning agents can severely damage the print head of your printer!